Atomic Red Team
Disclaimer: This post contains my personal notes and methodology for the respective TryHackMe room. All the credits for the room and the lab environment go to the original creators at TryHackMe. Flags are not revealed to preserve the challenge for others.
Objective
Leveraging the Atomic Red Team Framework to strengthen the Security Operations’ detection capabilities.
- Library of emulation tests developed by Red Canary
- The individual tests (atomics) are mapped to the MITRE ATT&CK framework.
- The process is as follows: Choose ATT&CK technique -> Choose test for that technique -> Execute test -> Analyze detections -> Make improvements to your defenses. And the cycle repeats.
- Atomic Red Team supports emulation from operating systems to cloud environments.
Atomic Red Team is a great tool for Blue Teamers to understand exactly how threat actors run their TTPs, and what exactly happens in action.
- Atomic Red Team emulates commands that mimic activity using Executors (
/bin/shor/bin/bashorcmd.exeorpowershell.exe) - There is another category of “Manual” executors, which involve GUIs or other steps that cannot be automated, and are often written down in steps.
Each Atomic is named by its MITRE ATT&CK technique ID, and often consist of two files:
.mdfile containing information about the atomic, platforms supported, commands to be executed etc..yamlfile, which is the configuration used by frameworks such as Invoke-Atomic and Atomic-Operator, to perform an emulation of the technique.
Tools such as Invoke-Atomic were developed to ease the threat emulation process, to automate the execution of Atomics.
The primary cmdlet used in this room is
Invoke-AtomicTestrather thanInvoke-AtomicRedTeam.
Setup
Execute all of the following commands in powershell.
We have to bypass execution policy in powershell to avoid security warnings: powershell -ExecutionPolicy bypass
We then have to import: Import-Module "C:\Tools\invoke-atomicredteam\Invoke-AtomicRedTeam.psd1" -Force
Include the path of the Atomics folder to allow easy access: $PSDefaultParameterValues = @{"Invoke-AtomicTest:PathToAtomicsFolder"="C:\Tools\AtomicRedTeam\atomics"}
To test if everything is setup correctly and working: help Invoke-AtomicTest
Basics of Invoke-AtomicTest
- To show brief details about a certain technique:
Invoke-AtomicTest T1127 -ShowDetailsBrief - To show more specific details about a certain technique:
Invoke-AtomicTest T1127 -ShowDetails
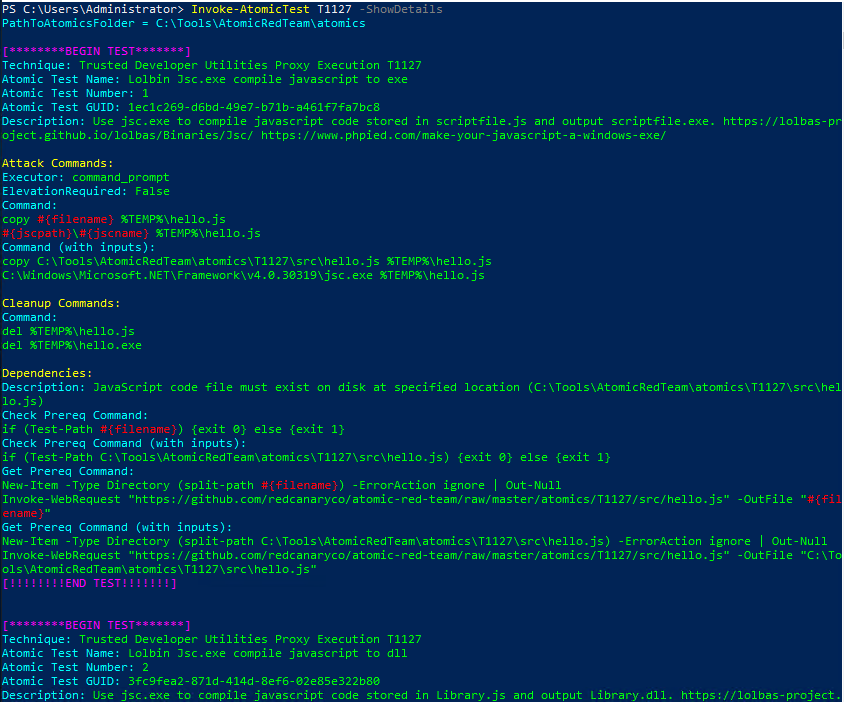
The above two commands are highly important, and must be used for every atomic test, and understood properly, before moving forward.
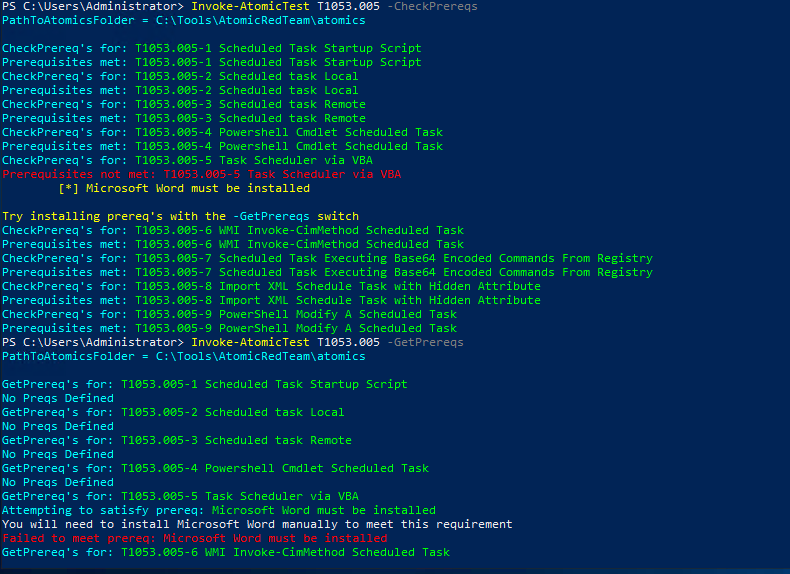
Invoke-AtomicTest T1127 -CheckPrereqscan be used to check if prerequisites are met (The prerequisites can be viewed from-ShowDetails).- If the required files or binaries are not available, use flag
-GetPrereqsto get them.
Execution
All examples listed below are for the technique T1127.
- Execute all tests:
Invoke-AtomicTest T1127 - Execute specific test numbers:
Invoke-AtomicTest T1127 -TestNumbers 1,2 - Execute tests based on the test names:
Invoke-AtomicTest T1127 -TestNames "Lolbin Jsc.exe compile javascript to dll" - Execute tests based on testGUID:
Invoke-AtomicTest T1127 -TestGuids 3fc9fea2-871d-414d-8ef6-02e85e322b80 - Execute the 2nd test:
Invoke-AtomicTest T1127-2
Example: T1053.005
Invoke-AtomicTest T1053.005 -ShowDetailsBrief
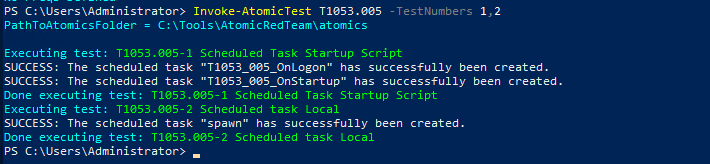
- Let’s test tests 1 and 2:
Invoke-AtomicTest T1053.005 -TestNumbers 1,2
- See if the scheduled task is indeed set up:
schtasks /tn T1053_005_OnLogon - Clean up to undo the changes done by the atomic test:
Invoke-AtomicTest T1053.005 -TestNumbers 1,2 -Cleanup - Check the
schtaskscommand again to see if everything was cleaned upschtasks /tn T1053_005_OnLogon- You should get “The system cannot find the file specified”.
Tasks
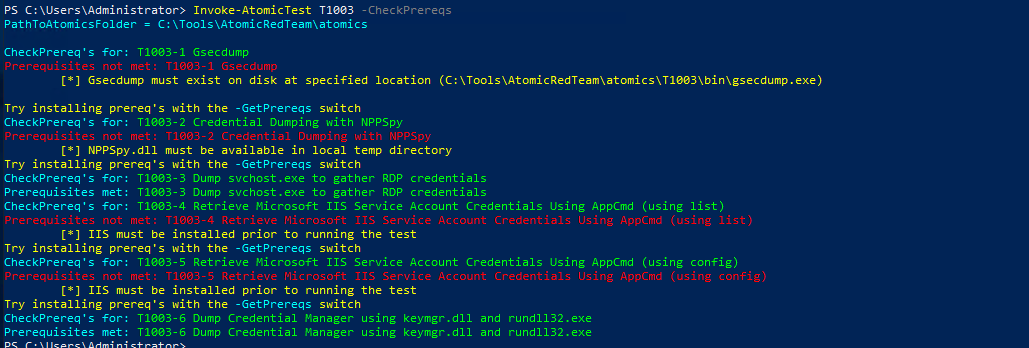
Invoke-AtomicTest T1110.001 -ShowDetailsBriefshould show all atomic tests for windows hosts, since we are running this in windowsInvoke-AtomicTest T1218.005 -ShowDetailsBriefshould show the name of the 2nd test.Invoke-AtomicTest T1003 -CheckPrereqsshould show all pre requisites not met.
Invoke-AtomicTest T1053.005 -TestNumbers 2should execute test 2, and show the name of the scheduled task created.- ` Invoke-AtomicTest T1547.001-2 -ShowDetails` should show details of the 2nd test, including the registry key modified.
It is pretty evident that every Atomic is written for a specific MITRE ATT&CK technique.
This means, to effectively use Atomic Red Team, we must leverage MITRE ATT&CK properly, using tools such as ATT&CK Navigator, which can help us aggregate the TTPs of a known threat actor or known APTs, and emulate their Atomics.
Leveraging Mitre ATT&CK Navigator
- We will choose to create a new layer
- Choose Enterprise.
- Using the search icon, select the threat group admin[@]338.
- click select to select the techniques attributed to this group.
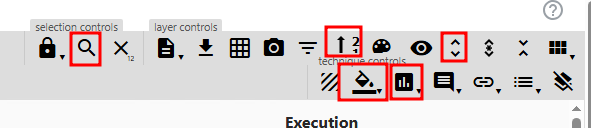
- Give it a background color by clicking on the fill background color icon at the top bar, to highlight them for ease of visibility.
admin[@]338 is a China-based threat group, primarily targeting organizations in the financial, economic and trade policy. They typically use publicly available RATs (Remote Access Trojans).
- Additionally, next to the background color icon, there is a scoring icon. Click on it, and set 1 as the score.
Below is a figure to highlight the icons used for all this:
These steps should reflect all techniques required to emulate this threat group.
- You would then have to hover over each technique, and take a note of their MITRE ATT&CK IDs, and build a command like the following
ls C:\Tools\AtomicRedTeam\atomics | Where-Object Name -Match "T1566.001|T1203|T1059.003|T1083|T1082|T1016|T1049|T1007|T1087.001"- One technique is omitted, because it isn’t available in the given virtual machine instance. (It is available on the instance provided for me, but not required in the current room, I guess)
- We then have to see the details for all these techniques:
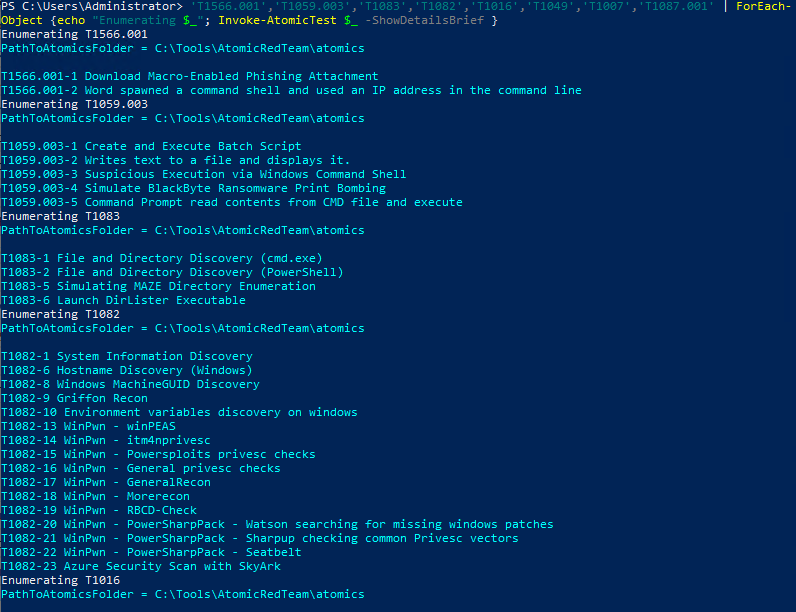
'T1566.001','T1059.003','T1083','T1082','T1016','T1049','T1007','T1087.001' | ForEach-Object {echo "Enumerating $_"; Invoke-AtomicTest $_ -ShowDetailsBrief }
- Check Prereqs:
'T1566.001','T1059.003','T1083','T1082','T1016','T1049','T1007','T1087.001' | ForEach-Object {echo "Enumerating $_"; Invoke-AtomicTest $_ -CheckPrereqs } - Get Prereqs:
'T1566.001','T1059.003','T1083','T1082','T1016','T1049','T1007','T1087.001' | ForEach-Object {echo "Enumerating $_"; Invoke-AtomicTest $_ -GetPrereqs }
Essentially, with that, all you have to do is, Invoke-AtomicTest each test. For the given lab of course, you just have to do them one by one. In real life, tha t may also be the case, but often, more automated and with more scale.
Emulation to Detection
Remember that we are doing all this to effectively wear our blue team hat, and apply all this in detection engineering.
The easiest way is to use the simple commands of -ShowDetails and executing the atomic directly, to see what happens, and making changes based on that.
You just have to use Event Viewer and Sysmon, to notice the changes. What you would get by doing this is, the exact logs generated, which can be used in Elastic Stack or any other SIEM you have set up. You may also use Aurora EDR.
Customising Atomic Red Team
Sometimes, the required Atomic may not be available or the emulation must be done with a specific setup. So it’s important to be able to customize Atomic Red Team, and be able to create custom Atomic tests.
In the .yaml file of an Atomic, the input_arguments field defines a hashtable where the key is the input name and the value can be specified by us. For example, username of a user to create or password of the user to create, when emulating a specific Atomic. Usually, there is a default value, but often, we can customize it to our needs.
When running the atomic tests, we can use flag -PromptForInputArgs which would interactively ask for the arguments, or -InputArgs in the following manner:
$customArgs = @{ "username" = "THM_Atomic"; "password" = "p[@]ssw0rd" }Invoke-AtomicTest T1136.001 -TestNumbers 3 -InputArgs $customArgs
Often, you have to also cleanup: Invoke-AtomicTest T1136.001 -TestNumbers 3 -PromptForInputArgs -Cleanup
Creating Atomics
You can use Start-AtomicGui, and access the interactive GUI application at localhost, port 8487.